Learning Site User Guide
Learning Site®
GETTING STARTED GUIDE v.3
Wayside Publishing® Tel/Fax: (888) 302-2519
waysidepublishing.com [email protected]
PO Box 3
Freeport, ME 04032
Welcome to Learning Site®
Whether you are using Learning Site® for the first time or you just need a refresher, here’s a guide to help you get the most from your Wayside Publishing® digital products.
Wayside Publishing’s® mission is to empower the next generation of global learners. Our Learning Site® provides engaging and equitable online tools and resources that foster active learning, allows for innovation and personalization, builds a global community, and creates an online ecosystem that depicts what users can do with languages. Through our content, activity types, and technology, students are given choices, have flexibility, make connections, set goals, and collaborate amongst classroom communities to apply learning to real world challenges.
NOTE: This guide will be updated frequently as Learning Site® goes through updates and improvements. To make sure you always have the most up-to-date content, download the most recent version here: Learning Site® Getting Started Guide. You can also access this guide on Learning Site® by selecting Getting Started Tutorial in the Help menu.
What’s Inside?
Rostering and LMS Integrations 04
Learning Site® Quick Overview 05
Learning Tools - Instructional Strategies Toolkit 06
Navigating Explorer® Content 10
Activity and Resource Actions 12
Accessing Tasks Submissions from the Grade Tab 14
Grading and Feedback Window 15
Grading and Feedback Window Tools 15
Wayside Publishing® Quick Links 22
Asking for Help

At Wayside Publishing®, we want to make sure you are always able to find the help you need. Teachers and students have access to on- demand learning opportunities which support both pedagogical and technological aspects focused on industry best practices.
The Help menu on Learning Site® provides access to our Video Tutorials, FAQs, Support Center, Automated Chat, and Feedback tool.
You can also contact our stellar support team at support@ waysidepublishing. com (for Learning Site® questions) or info@ waysidepublishing.com (for general information). Live phone support is available 8:30 a.m. to 8:00 p.m., Eastern Time, Monday through Friday at (888) 302-2519.
Rostering and LMS Integrations
Learning Site® can be integrated with Learning Management Systems (LMS) and Student Information Systems (SIS). For more information, please visit www.waysidepublishing.com/digital- solutions/integrations.
Your Computer or Device
Learning Site® can be used across devices, allowing for access anytime and anywhere!
For laptops, Chromebooks, or desktop computers, use the latest version of either Google Chrome, Microsoft Edge, or Apple Safari. Please note that Apple Safari does not support video recording.
For iOS devices, make sure you have the latest updates installed and are using the Learning Site® app from the Apple App Store. Learn more about the Learning Site® iOS app here.
TIP: Audio and video recording is fully supported on Chrome (desktop), Edge, or the Learning Site® iOS App. Audio and/or video recording may not be fully supported on other browsers, devices, or with some mobile LMS integrations.
For Android devices, make sure you have the latest updates installed and are using the Google Chrome mobile browser.
Learning Site®
Quick Overview
After logging in, you will see your Dashboard. The Dashboard is your centralized location for everything on Learning Site®.
Explorer® Class
Explorer® class contains the digital activities and resources that accompany each text. It is also where you can monitor student progress, manage assignments, access the FlexText®, view the roster, and adjust class settings. To learn more about using your Explorer® class, please see the Explorer® Class Overview section of this guide.
FlexText® Library
The FlexText® is the digital version of your text, available through your Explorer® class or the FlexText® Library link on your Dashboard. To learn more about the FlexText®, please see the FlexText® section of this guide.
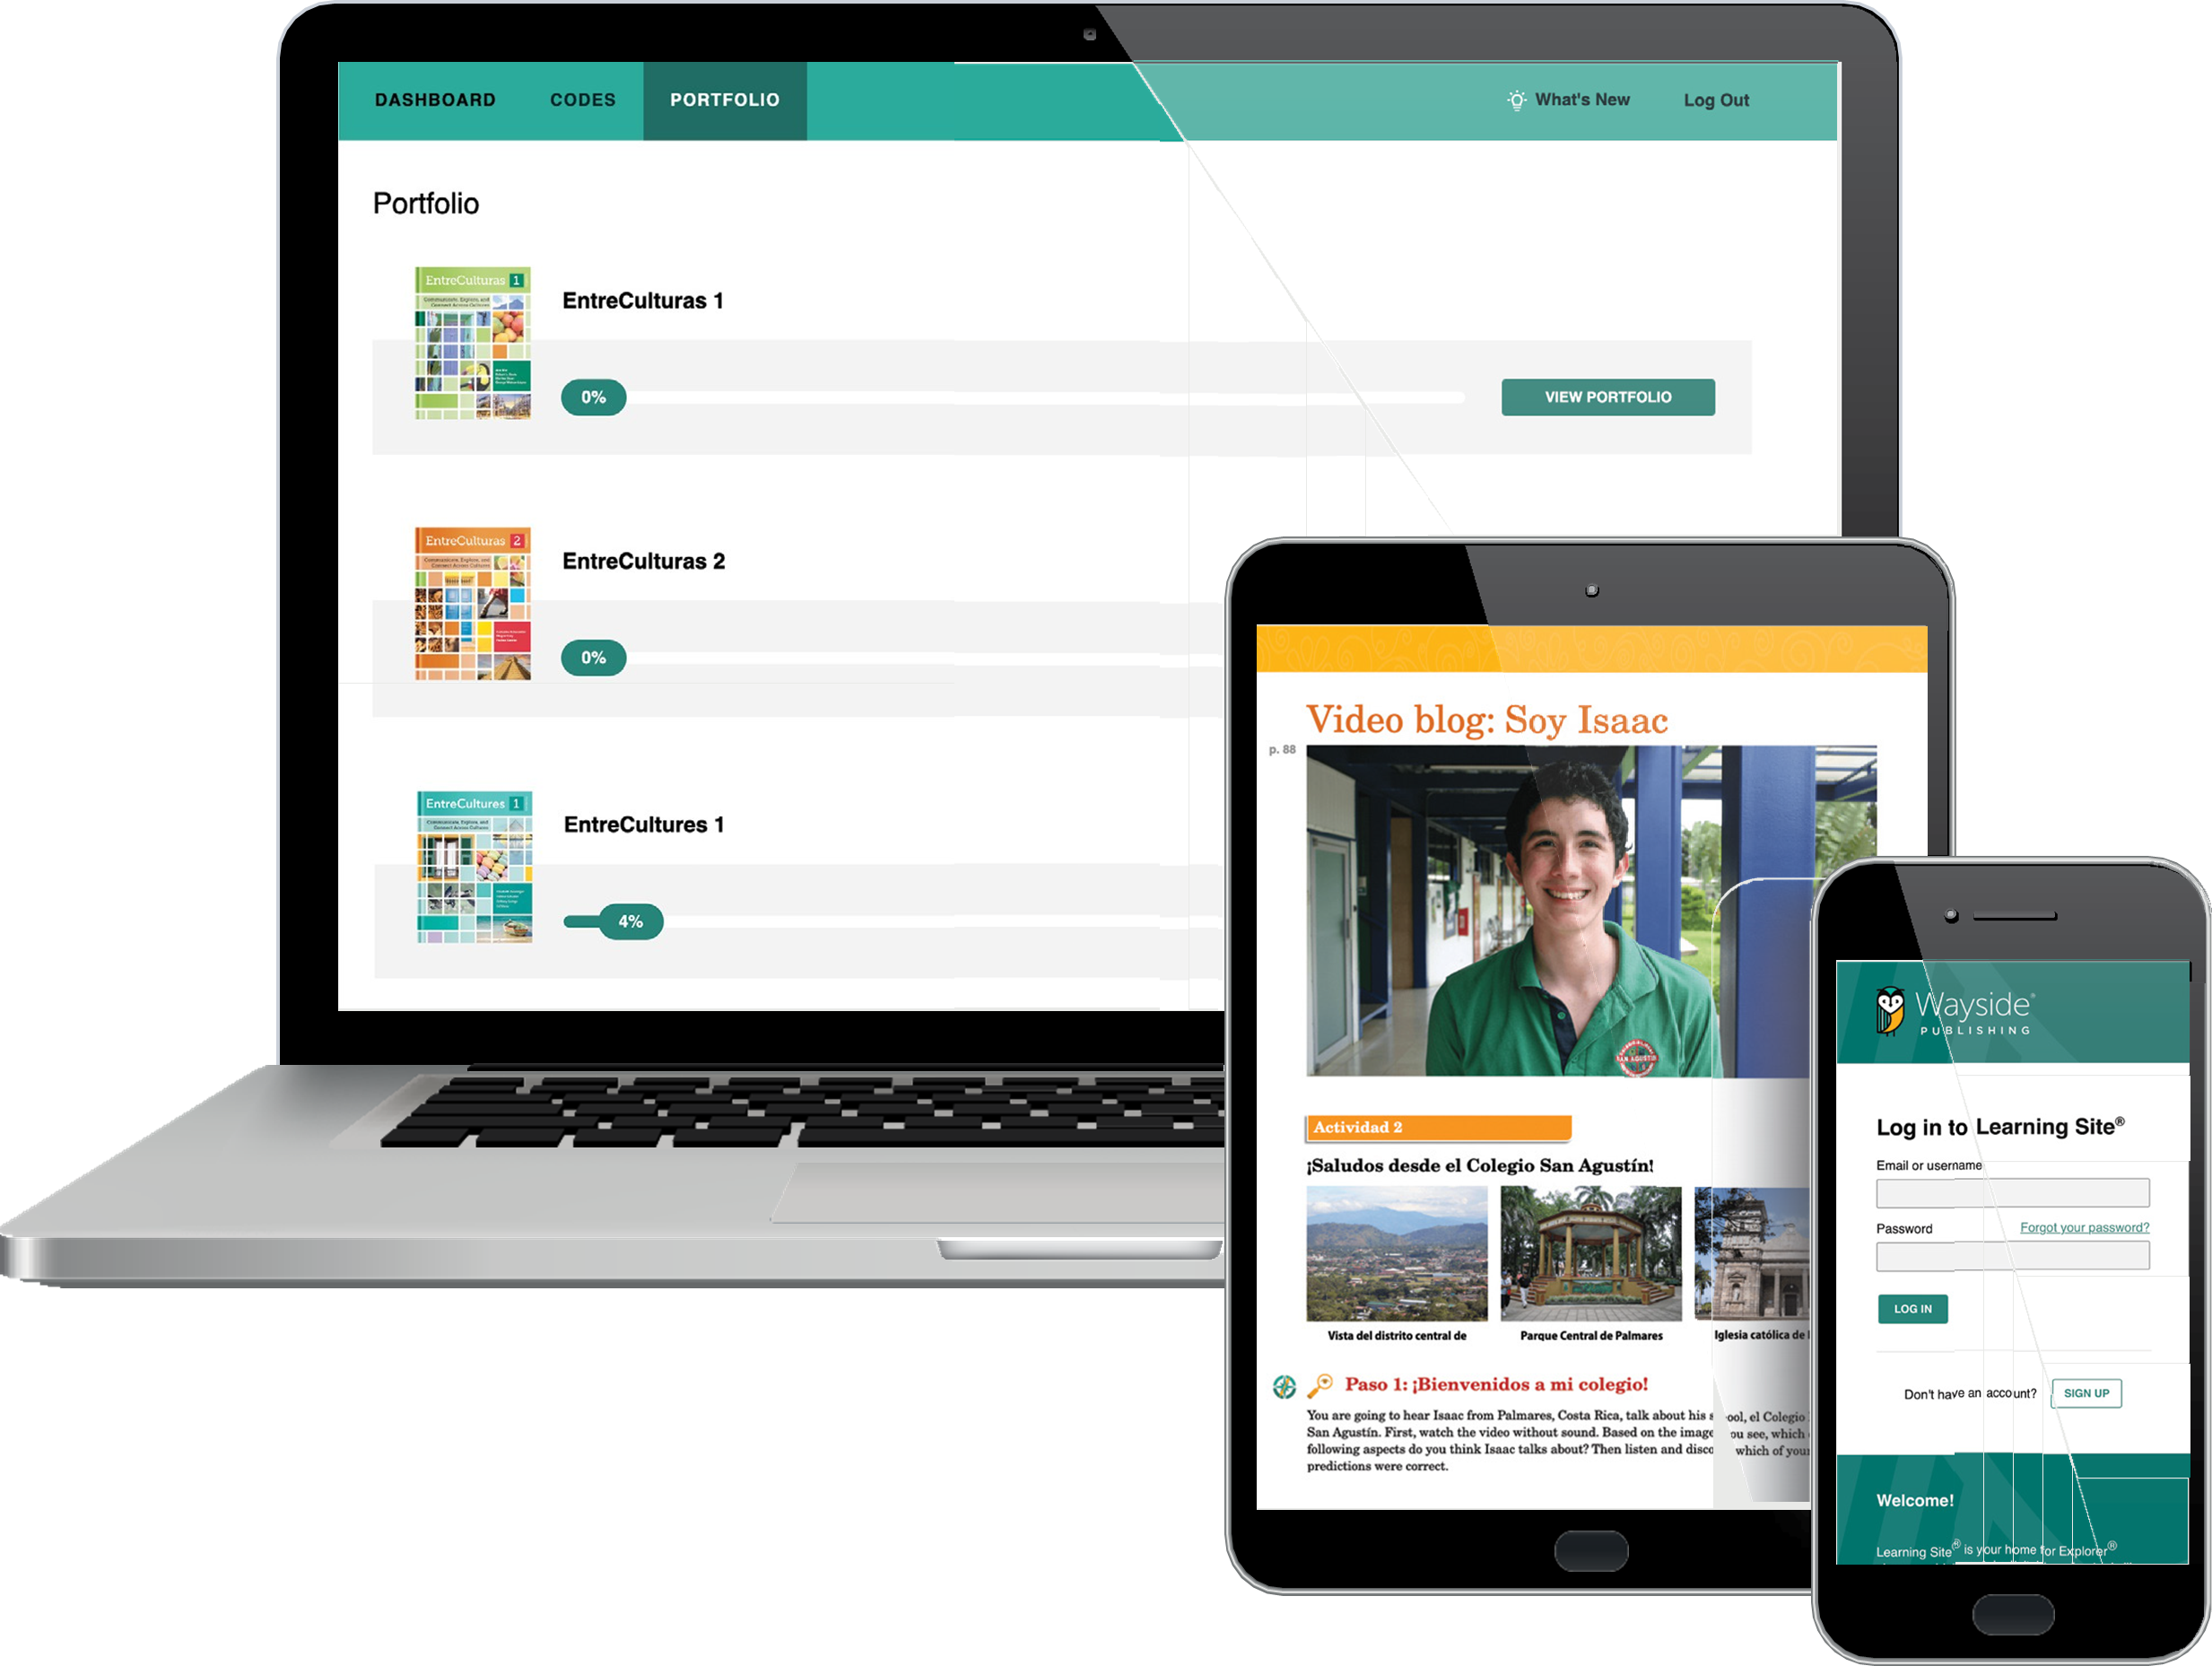
Portfolio
The integrated Portfolio*, linked to Can-do Statements, allows students to self-assess their progress and demonstrate understanding. Teachers can provide written, audio, or video feedback about each student’s self-assessment and choice of evidence. Student portfolios can be accessed directly from the top navigation menu.
For more information, please access the Learning Site® Language Portfolio Guide here or from the Portfolio page on Learning Site®.
Learning Tools – Instructional Strategies Toolkit
The Instructional Strategies Toolkit, accessed through the Learning Tools menu, provides a variety of instructional approaches that can be filtered by mode, skill, proficiency level, activity type, learning style, and more! Whether you are a new teacher or want to find new strategies, the toolkit provides built-in world language methodology and pedagogy training at any time.
What’s New
Use the What’s New section to learn more about recent updates to Learning Site®.
Profile
Select your name in the upper right corner to access and adjust your account information.
Help Menu
Tutorials, support resources, and ways to contact Wayside can all be found in theHelp menu.
*Not all textbook series have a student portfolio.
Explorer® Class Overview
Your Explorer® class contains the audio, video, and digital activities and resources that go along with each text. It is also where you can monitor student progress, manage assignments, access the FlexText®, view the roster, and adjust class settings.
FlexText®
The FlexText® is the digital version of your text.
Teachers have access to both the Student and
Teacher Edition. Students have access to the Student Edition only. The built-in tools and compass icon allow teachers and students to interact and engage with content directly from the FlexText®.
FlexText® Tools
Navigate
Use the Table of Contents to quickly navigate to a section the FlexText®. Teachers and students can also scroll through the FlexText® pages.
Search
Search by keyword or phrase in English or the target language.
Jump to page
Enter a page number to jump to that page in the FlexText®.
Notes/Highlights
Use the highlight tool to add highlights and notes. Selecting a highlight from the Notes menu will take you to its location in the FlexText®.
Compass Icon
The compass icon provides access to related activities and resources, quick actions menu, and the ability to interact with embedded media resources without leaving the FlexText®.
Hover over the compass icon to view the number of items related to a section of the FlexText®.
Select the compass icon to view the Related Items menu and access related content.
Select the hyperlinked title to open the activity or resource in the Explorer® Content tab, or select the pop-out button to open it in a new tab.
Select the Actions button to reveal the quick actions menu. Then, select an action from the drop-down list.
TIP: Linked audio and videos will play directly from the compass icon Related Items menu without having to navigate away from the FlexText®.
Please note that quick actions are dependent on the type of resource. To learn more about each quick action, please see the Activity and Resource Actions section of this guide.
Explorer® Content
The Explorer® Content tab contains instructional materials and resources for each unit along with teacher resources, rubrics, and more.
Classroom Forum
The Explorer® Content tab is where you and your students can directly access the Classroom Forum. The Classroom Forum allows for interpersonal communication, sharing resources, community-building, class communication, and more! Students and teachers can post written, audio, or video comments as well as links and images.
Navigating Explorer® Content
To access activities or resources, select a folder from either the main view area or the left navigation menu. Selecting the title of an activity or resource will either open it directly or open the Related Items view, depending on the activity or resource type.
Hover over the icon next to the title of a task to see a quick view of the activity type.
Use the browse functionality and search bar to help locate a resource though drop-down menu selections or by entering a key word or phrase in the search field.
TIP: Use the breadcrumbs (navigation path) to quickly return to a previous location.
Related Items view
Content Type Icons
Learning Site® content type icons can help you and your students quickly identify activities and resources. Please note that content types vary across text titles.
ICON
CONTENT TYPE
ICON
CONTENT TYPE
![]()
Article
![]()
Task
(activities such as matching, fill in the blank, multiple choice, long answer, audio/video recording, comparative recording, short answer, and file upload)
![]()
Audio
![]()
Survey
![]()
Document
![]()
URL
![]()
Flashcards
![]()
Video
![]()
Forum
![]()
Vocabulary Progression
Activity and Resource Actions
TIP: Teachers can view their own task activity submissions by selecting the Attempted by teacher filter in the Grades tab.
Activities and resources, depending on the type, have specific actions available for teachers and students. These actions can be taken by using selecting a button or a quick link on the Explorer® Content tab or from the Actions drop-down menu within the FlexText® compass icon. Use the chart below to learn more about each action.
ACTION
DESCRIPTION
Preview
- Selecting Preview allows teachers to view task activities without attempting and view answers to auto-graded task activities.
- Only teachers can preview a task activity.
Attempt
- Teachers and students can attempt a task activity by selecting Attempt.
Grades
No Grades Available
- Teachers can access student task submissions by selecting Grades. The Grades link or button will enable after at least one student has submitted a task activity (assigned or unassigned). If there are no student submissions, the button will be disabled and indicate no grades are available.
- Students can access their task submission(s) and review their grade and feedback by selecting Grades. The Grades link or button will enable once a student has submitted their task activity.
Assign
- Individual activities and resources can be assigned by selecting Assign. To assign more than one activity or resource at a time, please see the Assignments section of this guide.
- Only teachers can assign activities or resources.
Share
- Selecting Share allows teachers using Google Classroom to create a Google Classroom activity post for an individual activity or resource.
- Only teachers can share activities to Google Classroom.
Settings
- Teachers can adjust properties for an individual task activity by selecting Settings. To adjust properties that affect an entire Explorer® class, please see the Settings section of this guide.
- Only teachers can adjust properties for individual tasks or an Explorer® class.
Download
- Teachers and students can download audio and video resources, transcripts, and documents by selecting Download.
View
- Teachers and students can view flashcards by selecting View.
Grades
The Grades tab shows the results of your students’ (and your own!) task activity submissions. Use this tab to review student task details,
access the grading and feedback window, and view scores.
Overall grade:
The student’s overall grade is located in the column to the right of the student’s name. The task overall grade is located in the bottom row of the gradebook.
Export grades:
Select the Export Grades button to download the Grades tab as a detailed spreadsheet.
Statuses:
- Requires grading:
▲
Indicates there is at least one student attempt that requires manual grading. Overdue submission(s):
Indicates that a submission associated with the displayed grade was submitted after the due date or that the submission is past due.
– Not graded:
TIP: Apply the Not assigned, but attempted by students filter to
view unassigned but completed student submissions.
Indicates that a student has not yet submitted or because their submission needs manual grading.
Filters:
Apply filters related to activities, date ranges, sections, and attempt details.
The Filters button will be enabled for a new Explorer® class after one task activity has been submitted.
Accessing Task Submissions from the Grades Tab
The Grades tab provides two ways to access student task submissions and view task activity details. Teachers and students can also access task submissions from the Explorer® Content tab, Assignments tab, and FlexText® compass icon.
Select a student’s individual task from a gradebook column to immediately access the submission in the Learning Site® grading and feedback window.
Select the title of a task in the gradebook to view task-specific details and student attempt details. Select the Grade button to access student task submissions in the Learning Site® grading and feedback window.
Grading and Feedback Window
Teachers can easily review student task submissions and provide feedback using the Learning Site® grading and feedback window.
Grading and Feedback Window Tools
Student submission navigation:
Use the student drop-down menu or the navigation arrows to navigate between student submissions.
Total grade:
Select Edit to adjust a student’s total attempt grade on auto-graded tasks or enter a score for manually graded tasks.
Question grade:
Enter a grade into the text field to edit an individual question grade. The total attempt grade will automatically recalculate.
Teacher Feedback:
Select Edit to provide written, audio, or video feedback.
Attempts:
Select the individual Attempt tab(s) across the top to access multiple attempts.
Attempts can be removed by selecting Remove this attempt at the bottom of the window.
Submission details:
Date, time, and duration details for each submission are located at the bottom of the window.
Adding Inline Comments
Inline comments can be added to student written responses and audio or video recordings using built-in features.
Written responses
Some tasks contain a text entry field. You can highlight student written responses entered in the text entry field.
To highlight, select text from the student’s response, select a highlight color, add comments to the Add note section, and then select Save.
Audio or video response
Some tasks provide students with the ability to record an audio or video response. You have the option to add timestamped, clickable comments to student audio or video responses.
To add a timestamped comment, select Add a comment while the student audio or video recording plays. You will then be able to provide written or audio feedback.
Students will be able to select the timestamped
comment, view or listen to their recording at that moment, and review feedback you may have left.
Assignments
The Assignments tab is where you can assign activities and view assignment details.
Teachers and students can select between a calendar or list view. The default for teachers is list view. Calendar view is the default for students.
TIP: Students who join an Explorer® class after you’ve created an assignment will need to be reassigned those assignments.
Assignments Tools
Add Assignment:
Use the Add Assignment button to assign a single activity or multiple activities at one time.
Edit:
Use the Edit button to edit assignment details.
Archive:
Use the Archive button to archive an assignment and remove it from view. Archived assignments can be unarchived and edited.
Remove:
Use the Remove button to delete an assignment. Removed assignments are permanently deleted.
Students:
Use the Students button to view student assignment status details.
Students
The Students tab is where you will be able to view an Explorer® class roster.
For rostered customers, your Explorer® class roster is managed automatically through your rostering integration. If you have questions regarding your Explorer® class roster, please contact your school or district’s IT department. For information on Learning Site® rostering options, please visit the Wayside Publishing® rostering page.
If you are using access codes, you can invite students to your class and transfer students to another class if needed. For more information on inviting and transferring students, please visit the Wayside Support Center.
Invite:
Select Invite to access the enrollment share link or invite students by email to your Explorer® class.
Transfer:
Select Transfer to move students into another Explorer® class if needed.
Settings
The Settings tab allows you to adjust properties that affect an entire Explorer® class. You can customize each class individually by adjusting task settings and selecting what content is visible to students.
Task Settings
Mask task attempts
Change the default maximum number of attempts for all tasks in an entire Explorer® class. Please note that changes to the default maximum number of attempts will affect all tasks, including ones already submitted, unless the task has customized settings.
Task grading criteria
TIP: Individual tasks can have settings that differ from Explorer® class settings. Use a task’s Settings action to customize its settings.
Use the toggle to select customized grading criteria for all tasks.
Customized individual tasks
Individual tasks with customized settings that differ from Explorer® class settings will appear at the bottom of the screen.
Select Settings to view or adjust the customized settings for an individual task.
Select the title of a task to view it on the Explorer® Content tab.
Show/Hide Settings
The Show/Hide content page on the Settings tab allows teachers to decide what content is visible to students within the Explorer® Content tab, Related Items view, and FlexText® compass icons.
Please note that FlexText® pages cannot be hidden.
By default, all content is marked as visible. Select or deselect the checkbox next to a folder, subfolder, or resource to make it visible or hidden. Use the icon to expand a folder.
Hidden content will not be visible to students within the Explorer® Content tab, Related Items view, and FlexText® compass icons. However, hidden content is still visible for teachers and will have hidden indicators on the Explorer® Content tab. Hidden content can be accessed by students without making it visible if assigned using Learning Site® assigning functionality.
(Hidden content teacher view) (Hidden content student view)
instagram.com/waysidepublishing
twitter.com/WaysidePublish
facebook.com/WaysidePublishing
Wayside Publishing® Quick Links
Wayside Publishing®
Learning Site®
learningsite.waysidepublishing.com
Learning Site® iOS App
Customer Life Cycle - Account Manager
Portfolio Guidelines
learningsite.waysidepublishing.com/ls_portfolio_guide.pdf
Video Tutorials
Wayside Publishing® YouTube Channel
Professional Development waysidepublishing.com/teaching-resources/ professional-development
Flex Learning
waysidepublishing.com/digital-solutions/flex-learning
Wayside Publishing® Community waysidepublishing.com/teaching-resources/ community
Wayside Publishing® Support Center
support.waysidepublishing.com/s/
Customer Service
Digital Support
Live Phone Support
(888) 302-2519 | M-F, 8:30 a.m. to 8:00 p.m. (ET)
Learning Site® Integrations
waysidepublishing.com/digital-solutions/integrations
Learning Site® Rostering
waysidepublishing.com/digital-solutions/rostering
Learning Site® Accessibility Statement
waysidepublishing.com/digital-solutions/accessibility
Learning Site® Privacy Policy